
Retro Power Supply Pinouts: Quick Reference
The power connector, rails and current rating for every machine we build supplies for: Commodore, Amiga, ColecoVision and Atari, on one page.
August 22, 2026
This is the short version: which connector each machine uses, what comes out of it, and where to find the full contact-by-contact diagram. If you only need to identify a connector or check a rating, everything is on this page.
A picture is not a wiring instruction. Every diagram on this site is drawn as you look into the socket on the machine. Looking at the plug instead mirrors it left-to-right, and a mirrored power connector is how hardware gets destroyed. Before you solder anything, confirm every rail with a multimeter on the hardware in front of you.
At a glance
| Machine | Connector | Rails | Our replacement rating |
|---|---|---|---|
| Commodore 64 | 7-pin round DIN | +5V DC, 9V AC | 5V/2.0A · 9V AC/1.1A |
| Commodore 128 | 5-pin square DIN | +5V DC, 9V AC | 5V/3.0A · 9V AC/1.1A |
| Amiga 500 | 5-pin square DIN | +5V, +12V, -12V DC, shield | 5V/4.0A · 12V/2.0A · -12V/0.5A |
| ColecoVision | 4-pin rectangular | +5V, +12V, -5V DC | 5V/4.0A · 12V/2.0A · -5V/0.5A |
| Atari XL / XE | 7-pin round DIN | +5V DC only | 5V/2.0A |
| Atari 520ST / 260ST | 7-pin round DIN | +5V, +12V, -12V DC | 5V/4.0A · 12V/2.0A · -12V/0.5A |
| Amiga CD32 | 4-pin round DIN | +5V, +12V DC | 5V/4.0A · 12V/2.0A |
| ZX Spectrum | 6-pin round DIN | +5V, +12V, -12V DC | 5V/4.0A · 12V/2.0A · -12V/0.5A |
| Commodore Plus/4 | 4-pin square DIN | +5V DC, 9V AC | 5V/2.0A · 9V AC/1.1A |
| TI-99/4A | 4-pin rectangular | +5V, +12V, -5V DC | 5V/4.0A · 12V/2.0A · -5V/0.5A |
| Sinclair QL | 3-pin rectangular | +9V DC, 15.6V AC | 9V/2.2A · 15.6V AC/0.25A |
Each machine name links to its full pinout, with the contact positions drawn out.
The two mistakes that destroy hardware
Same shell, different rails
Three machines share the 7-pin round DIN shell, and they carry one, one and three rails respectively. Every one of those plugs mates with every one of those sockets.
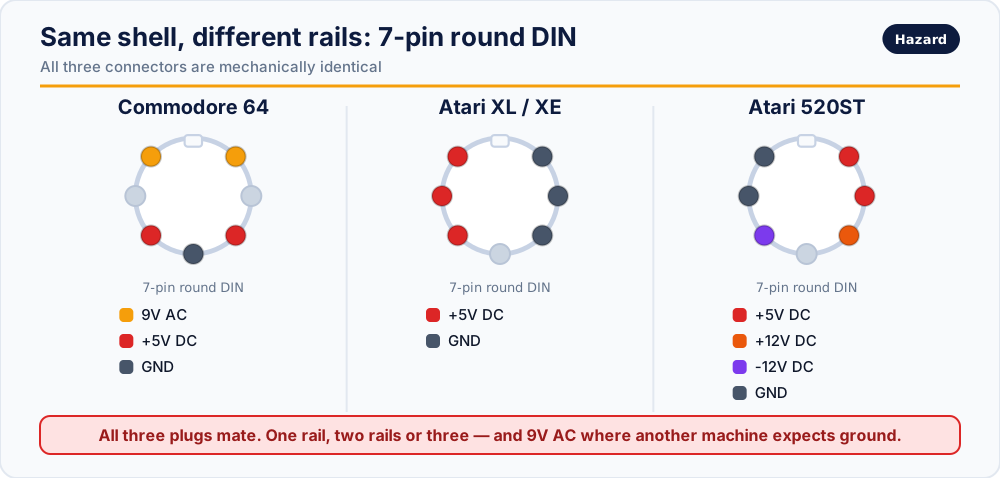
The C64 puts 9V AC on two contacts; the Atari XL/XE expects +5V and ground on those positions and has no rectifier to survive the difference. The 520ST adds +12V and −12V that neither of the others has anywhere in it.
Nothing mechanical stops any of those six combinations. Only the label does.
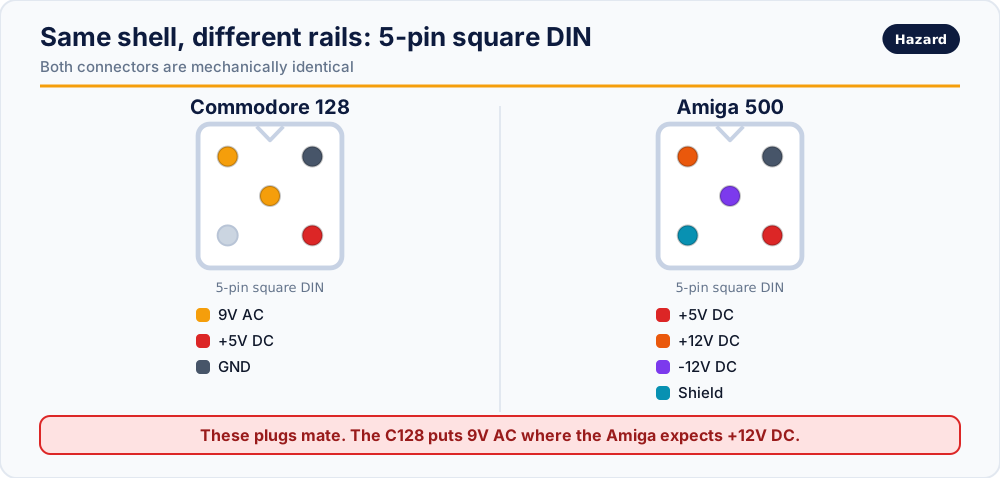
The Commodore 128 and the Amiga 500 share the 5-pin square DIN in exactly the same way — 9V AC on one machine where the other expects +12V DC.
Same rails, different capacity
A Commodore 64 supply and a Commodore 128 supply provide the same two rails with the same names. The C128 needs 3.0 A on the 5V rail against the C64's 2.0 A, because of the extra RAM, the second CPU and the VDC video chip.
Adapters between connector styles are useful and legitimate, but an adapter changes the shape of the plug, never the capacity of the supply behind it. Adapt upward, never downward.
Reading a specification
- Volts is what the machine requires. It is not negotiable, and on an unregulated rail it is not guaranteed either.
- Amps is what the supply can deliver, not what it will force into the machine. A higher current rating is safe; a lower one is not.
- AC vs DC is not a detail. 9V AC is left as alternating current on purpose — Commodore machines rectify it internally for their +12V rail and count its 50/60 Hz cycles to drive the Time-of-Day clocks.
- Negative rails (-5V, -12V) are usually tiny in current and essential in function. They run period DRAM and serial line drivers, and their absence produces faults that look like anything but a power problem.
There is a longer explanation in Volts, amps and 9V AC explained.
Before connecting any vintage supply
- Inspect the case, the cable and the plug for damage.
- Plug the supply into mains with the computer disconnected.
- Measure every rail at the plug, against the connector's own ground contact.
- Confirm the polarity of each rail — a negative rail must read negative.
- Watch the readings for a minute. A rail that drifts upward as the case warms is a regulator on its way out.
- Anything above about 5.2 V where 5 V is expected: stop. Do not connect it "just to check".
- Only when every measurement is correct, connect the machine.
Wire colour is not a specification. Replacement cables are made by many different people to no shared convention. A colour table found online may describe a different cable than the one in your hand. The meter is the only authority.
Safety
Vintage power supplies contain mains-voltage circuitry and can hold a dangerous charge after being unplugged. If you are not experienced with mains electricity, do not open one — measuring at the output plug, as described above, is safe and tells you what you need to know.
Full pinouts
Commodore
Atari
Sinclair
Others