
My Commodore 64 Will Not Turn On
A step-by-step way to tell whether a dead Commodore 64 is a power supply problem or a machine problem — without risking further damage while you find out.
August 7, 2026
A Commodore 64 that shows nothing when switched on is one of the most common problems in retro computing, and the power supply is the most common cause. It is also the one part you can test without opening the computer.
Work through this in order. The sequence matters: the early steps are designed to stop you making things worse while you diagnose.
The most important rule. If you suspect the power supply, do not "just try it" on the machine to confirm. A failing C64 brick usually fails by passing unregulated voltage straight to the 5V rail, and the C64 has no internal regulator to absorb it. The test that confirms your suspicion is the same event that destroys the RAM, the PLA, the SID and the CPU.
Step 1 — Read the symptom precisely
The exact symptom narrows things down substantially.
| What you see | Most likely area |
|---|---|
| Nothing at all — no LED, no screen | Power supply, fuse, or mains |
| LED on, black screen | Machine-side fault, or a marginal 5V rail |
| LED on, screen border but no text | Machine-side fault — RAM, PLA, ROM |
| Garbled or corrupted text | RAM, or a sagging 5V rail |
| Works, then dies after a few minutes | Almost always a failing supply |
| Was working, died suddenly with a smell | Stop. Do not power it again. |
That last row deserves its own note: a burning smell means something has already failed, and repeating the experiment adds damage without adding information.
The middle rows are worth reading carefully. "LED on, black screen" is genuinely ambiguous — the LED runs from the same 5V rail, but it will light on a rail far too weak or too noisy to run the logic.
Step 2 — Rule out the boring causes
Before reaching for a meter:
- Is the supply plugged in at both ends and the wall switch on?
- Does the C64's own power switch actually click? They wear out.
- Try a different mains socket — an outlet on a tripped circuit looks identical to a dead machine.
- Check the fuse if your supply has an accessible one.
- Disconnect everything — cartridges, disk drives, user port devices, joysticks. A shorted peripheral will hold the whole rail down and imitate a dead machine perfectly.
Step 5 catches more faults than people expect. A cartridge with a bent pin is indistinguishable from a dead computer until you remove it.
Step 3 — Measure the supply, with the computer disconnected
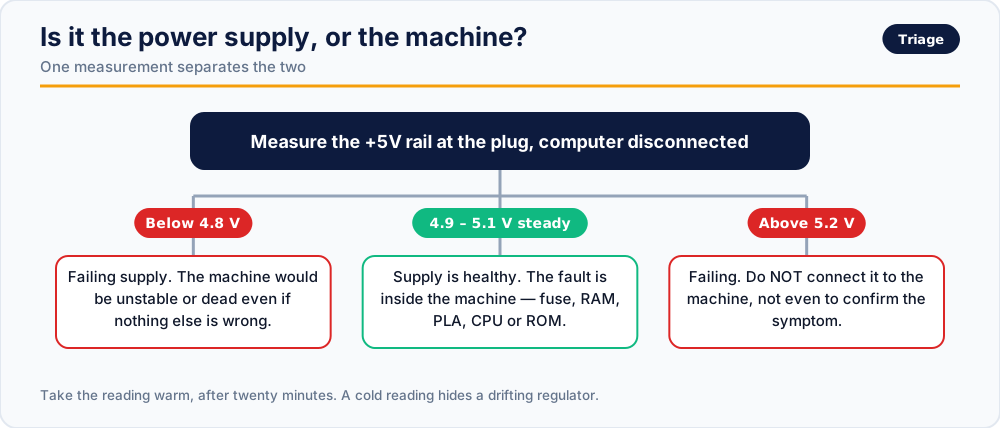
This is the decisive test, and it is safe: you are probing the output plug, not opening anything.
Unplug the supply from the computer, leave it plugged into mains, and probe the plug itself. Positions are as you look into the socket on the computer, keyway at the top — the full pinout is here.
- DC volts between a lower contact and the bottom-centre ground contact. Expect a steady reading very close to 5.0 V.
- AC volts between the two upper contacts — between the two AC legs, not from one leg to ground. Expect roughly 9 V AC.
- Leave the supply running for several minutes with the meter attached to the DC rail, and watch it.
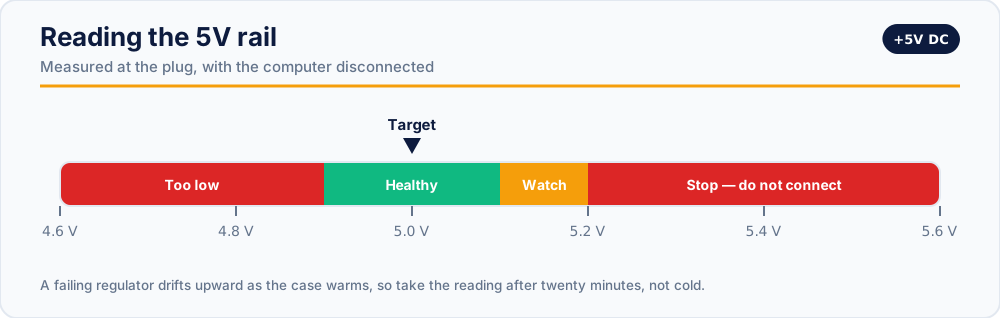
Now interpret:
| Reading | Meaning |
|---|---|
| 4.9 – 5.1 V DC, steady | The 5V rail is healthy |
| Above 5.2 V DC | Failing. Do not connect it to the machine. |
| Below 4.8 V DC | Failing — the machine will be unstable or dead |
| Climbs as the case warms | Failing regulator; it will get worse |
| No DC at all | Dead supply, or an internal fuse |
| No 9V AC | Dead AC winding — the machine will not run correctly |
A supply that reads high is the dangerous case, not the harmless one. There is no safe way to use it and no version of "it was fine yesterday" that changes this.
Step 4 — If the supply is good
Then the fault is in the machine, and the power supply has been cleared. Common machine-side causes, roughly in order of frequency:
- The internal fuse. The C64 has one on the board. It is often overlooked because people assume the brick holds the only fuse.
- RAM. Failing RAM chips produce black screens, garbled screens, and intermittent behaviour.
- The PLA. A famous failure point, and a common cause of a completely dead machine that has healthy power.
- The CPU or the ROMs.
- The power switch or socket. Mechanical, worn, and easy to test for continuity.
At this point you are in repair territory rather than replacement territory. A diagnostic cartridge is a good next step, if the machine will run one.
Step 5 — If the supply is bad
Replace it, and do not repair it. That is not a sales position, it is what the failure mode dictates.
The 5V regulator in an original Commodore brick is potted in epoxy. It cannot be inspected, it cannot be re-capped, and it cannot be replaced without destroying the case. A brick that has drifted once will drift again, and the component it takes with it is the computer.
A modern regulated supply removes the failure mode rather than postponing it:
- RetroPower PSU C64 — US plug · International plug
- RetroPower PSU C64 with OLED display — US plug · International plug
The OLED models show the live output voltage on the front, which turns "is my power supply drifting?" from a job requiring a meter into something you can see at a glance.
A note on machines that already died
If a C64 stopped working while an old brick was attached, and that brick now measures high, assume the machine has taken damage. It may still be repairable — RAM and the PLA are socketed on many boards — but connecting a new supply will not by itself bring it back, and it is not a fault of the new supply when it does not.
Related reading
- Commodore 64 power connector pinout
- Original vs modern power supply — what actually fails inside a vintage brick
- Which power supply do I need?
Vintage power supplies contain mains-voltage circuitry and can hold a dangerous charge after being unplugged. Everything described above is measured at the output plug — there is no reason to open one, and if you are not experienced with mains electricity, do not.